
Configuring Single Sign-On (SSO)
You can access Celoxis with corporate credentials if SAML-based SSO is enabled for your account. Celoxis works with Google, Salesforce, Okta, OneLogin, Microsoft Azure and Microsoft ADFS. Although, we have not tested, any SAML 2.0 based IDP should work.
For SSO to work, ensure the following:
- Your SSO Identity Provider (IDP) is SAML 2.0 based.
- All your users, clients have unique email addresses.
- The email address of a user in Celoxis matches the email address for that user in your IDP.
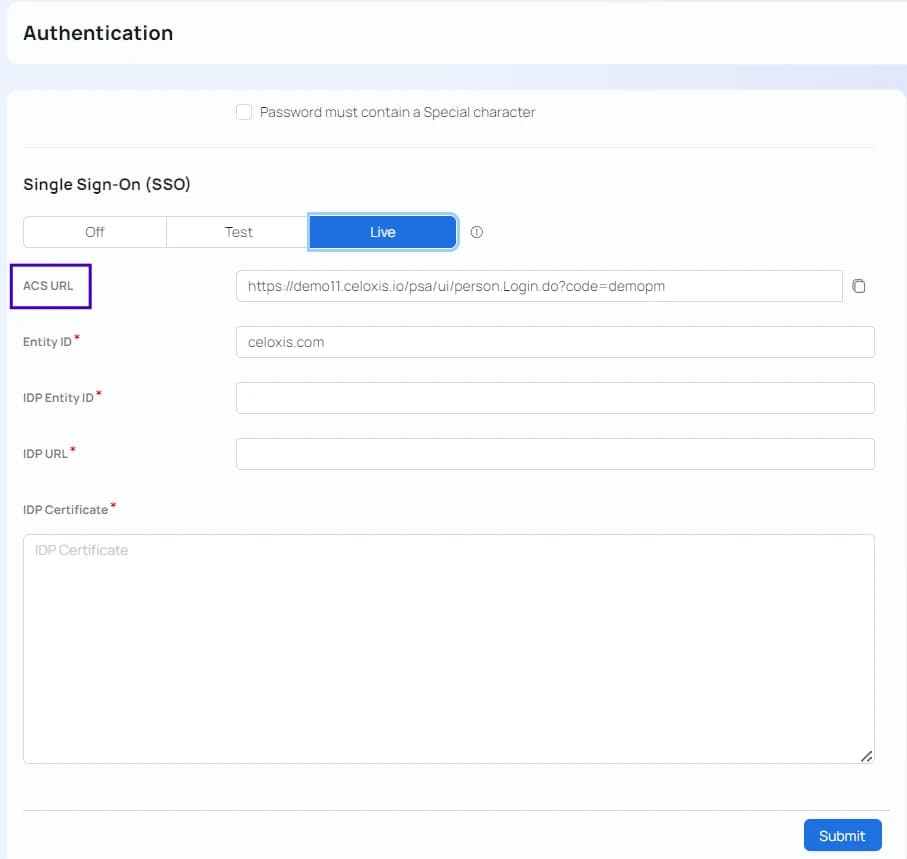
To setup SSO, open Main MenuAdminAccount ManagementCompany Information and click on Single Sign-On. You will see the form like this:
SSO Modes
In all modes, client accounts will continue to be authenticated using Celoxis credentials.
- None – SSO is off. Only Celoxis credentials can be used to log in.
- Test – SSO is on. SSO and Celoxis credentials can both be used to log in.
- Live – SSO is on. Only SSO can be used to log in.
- Your users will not be able to Forgot Password link in Celoxis since we will not store user passwords.
- You will not see the Login and Password fields on the add/edit user forms.
- If you are locked-out for any reason, contact us and we shall reset your SSO details.
Steps in setting up SSO
1: Enable SSO in Test mode
Open Main MenuAdminAccount ManagementCompany Information and go to the Single Sign-On tab
- From the Status row, click on the Test radio button.
- From the options below, copy the ACS URL. This will be required to setup your IDP.
- Setup your IDP. The IDP will give you a set of settings to enter into Celoxis.
- Come back to this screen with the settings collected in the previous step.
- Enter the IDP Entity ID. This is provided by the IDP.
- Enter the IDP URL. This is the address of your IDP which will be contacted for authenticating users.
- Copy - Paste the IDP Certificate. This information is available in the certificate provided by your IDP.
- Click Save
2: Test your setup
- After your step 1 is complete, you should try login to Celoxis by clicking on the Connect via Single Sign-On link on the Login page.
- After you click on the above link, you will be prompted to enter the email address.
- After entering this, you are directed to your IDP login screen; if not already logged in, where you are prompted you to enter the Email and password.
- After successful authentication, you are directed to Celoxis Dashboard. If something goes wrong, have a look at the Common Errors section under your IDP.
3: Go Live with your SSO
- After you have successfully completed step 2, review your SSO details again.
- Then, click on Live.
- Click on Save.
Setting up your IDP
Before you set up Celoxis, you will first need to tell your IDP about Celoxis. The following are the instructions for some of the popular IDPs. If your IDP is not listed here, please consult its documentation.
All IDPs will require an ACS URL for Celoxis. You can find this for your organization by clicking on Test or Live radio buttons as shown above.
Create a SAML App in Google
- Sign in to your Google Admin console using an administrator account.
- Click Apps > SAML apps.
- Click the plus icon in the bottom corner.
- Click on SETUP MY OWN CUSTOM APP.
- The Google IDP Information window opens and the SSO URL and the Entity ID fields are automatically populated. You need to copy the Entity ID and the SSO field values and download the IDP metadata (Option 2) to paste them into the appropriate fields in Celoxis.
- After you have entered this information in Celoxis, come back to the admin console and click Next.
- In the Basic window, enter an Application name and Description.
- Click Next.
- In the Service Provider Details window, enter:
- ACS URL: Enter the value copied from the SSO tab.
- Entity ID: Enter
celoxis.com - Start URL: For SaaS, enter
https://app.celoxis.com/psa/person.Login.do, for On-Premise,https://your_URL/person.Login.do
- Leave Signed Response unchecked.
- Under the Name ID, for Basic Information, select Primary Email.
- UnderName ID Format drop-down, pick EMAIL.
- Click on Next.
- Click Finish.
Enable the SAML App for users
- Go to Apps > SAML apps.
- Select the SAML app your created above.
- At the top of the gray box, click on Settings and choose On for everyone and confirm the settings.
Common Errors
Error: app_not_enabled_for_user
Solution: You have not enabled the SAML app for your users. Follow the steps mentioned above to enable the app for everyone. The same error will be shown if you are logged in to Google account using a different user than the one setup for IDP.
Server Error : No company found with company code: XXXX
Solution: The ACS URL you have entered in Google configuration is incorrect. Copy the correct URL from the ACS URL field under Single Sign-On tab in Celoxis.
Invalid Request, no idpId in request URL or Destination param of the SAML request.
Solution: The IDP URL you entered in Celoxis is incorrect. You need to copy this from your IDP and paste it in Celoxis.
- Enable My Domain from Setup > Administer > Domain Management > My Domain. Deploy it to all users. This will automatically create Salesforce Identity Provider.
- Navigate to Administer > Security Controls > Identity Provider. You will see Identity Provider setup details which needs to be entered in Celoxis.
- C$lick on theDownload Metadata button to download the certificate. The contents of this certificate is to be entered in the IDP Certficate field in Celoxis as described earlier in the document.
- Now, on the same page below, click on Service Providers are now created via Connected Apps. Click here.
- On the New Connected App page, enter the following details:
- Connected App Name
- Start URL
- Check the Enable SAML checkbox.
- Entity ID
- ACS URL
- Subject Type: Select Custom Attribute
- Name ID Format: Select
urn:oasis:names:tc:SAML:1.1:nameid-format:emailAddress - IdP Certificate: Select the appropriate certificate you have entered in Celoxis (Step 3)
- Click on Save.
- After the App is created, you now have to associate User profiles to this so that users belonging to these profiles can login via SSO.
Navigate toManage Apps > Connected Apps. Click on the app your just created. - Scroll down and click on Manage Profiles.
- Select the required profiles and click on Save.
Common Errors
Server Error Not authenticated
Solution: The IDP certificate you have entered in Celoxis is incorrect. Enter the correct certificate you have created for this (Step 3 above) You will face the same error if you have not associated the logging in user's profile with the Connected app as explained in step 7 to 9 above.
- Log in to your Okta organization as a user with administrative privileges.
- Click on the Admin button on top-right.
- Click on the Add Apps label.
- Click on the Create New App button.
- In the dialog that opens, select the SAML 2.0 option, then click the Create button.
- On the General Settings page, enter the application name, for e.g. Celoxis in the App name field, then click the Next button.
- For Configure SAML step, enter the following details:
- Single sign on URL: This is the ACS URL you will get from Celoxis
- Audience URI (SP Entity ID): For SaaS users, enter:
https://app.celoxis.com; for On-Premise users, enter the URL of your application. - Name ID format:
EmailAddress
- Click Next.
- In Feedback, select “I’m an Okta customer adding an internal app”, and “This is an internal app that we have created,” then click Finish.
- In the People section of the application, click on the Assign to People button. Select the required users and click on Done.
- In the Sign On section of your newly created application click on View Setup Instructions. A new tab opens with the details you need to enter in Celoxis. Fill the Single Sign-On tab in Celoxis as mentioned earlier in this document.
Common Errors
If you are still prompted for credentials after clicking on Connect via SSO and entering SSO credentials, it means that you have entered the ACS URL /Single sign on URL in Okta incorrectly. Please correct and try again.
Sorry, you can't access <app name> because you are not assigned this app in Okta.
The user who is trying to login via SSO is not assigned to the app created in Okta. Redo the step Assign to People mentioned above.
- Login to your OneLogin account with administrator privileges.
- Click on Applications > Applications from the main menu.
- Click the Add App button.
- Search for SAML Test Connector (IdP w/ attr w/ sign response) and click on it.
- Enter Celoxis as the Display Name and click on Save.
- Click on the Configuration tab.
- Copy the ACL URL from Celoxis to the Recipient and ACS (Consumer) URL tab.
- In the ACS (Consumer) URL Validator field, escape the ACS URL as mentioned in the OneLogin documentation. In short, you have to prefix the url with
^put the backslash character (\) before each forward-slash character. e.g.^https:\/\/app.celoxis.com\/psa\/person.Login.do?code=abc - Your OneLogin screen should look something like this: Click the Save button.
- Click on the SSO tab.
- Copy the SAML 2.0 Endpoint (HTTP) URL and set it as the IDP URL in Celoxis.
Common Errors
The response was received at <Celoxis URL> instead of <URL>
The ACS (Consumer) URL Validator is not URL escaped as shown in screenshot above.
- Log in to ADFS Server.
- Launch the ADFS Management Console.
- Open the AD FS > Trust Relationships folder from the LHS menu.
- Right-click on Replying Party Trusts and choose Add Relying Party Trust... menu item.
- This will open a Wizard. Click on the Start button.
- In the Select Data Source step, select the Enter data about the relying party manually option. Click Next.
- In the Specify Display Name step, enter Celoxis. Click Next.
- In the Choose Profile step, select AD FS profile. Click Next.
- In the Configure Certificate step, we shall use the defaults. Click Next.
- In the Configure URL step, check the Enable support for the SAML 2.0 WebSSO protocol option. Under the Relaying party SAML 2.0 SSO service URL, enter the ACS URL copied from Celoxis. Click Next.
- In the Configure Identifiers step, enter the ACS URL as the Relaying party trust identifier and click Add. Click Next.
- In the Configure Multi-factor... step, we shall use the defaults. Click Next.
- In the Choose Issuance Authorization... step, choose Permit all users to access this relying party. Click Next.
- In the Ready to Add Trust step, you will be shown an overview of your settings. Click Next.
- In the Finish step, select the Open the Edit Claims... option. Click Close.
- You should now be shown the Claims Editor window.
- Click Add Rule... under the Issuance Transform Rules tab.
- In the Choose Rule Type step, select Send LDAP Attributes as Claims as the Claim Rule Template . Click Next.
- On the next screen, using Active Directory as your attribute store, do the following:
- From the LDAP Attribute column, select E-Mail Addresses.
- From the Outgoing Claim Type, select E-Mail Address.
- Click OK to save this rule.
- Click Add Rule... under the Issuance Transform Rules tab to add a new rule.
- In the Choose Rule Type step, select Transform an Incoming Claim as the Claim Rule Template . Click Next.
- On the next screen:
- Select E-Mail Addresses as the Incoming claim type.
- Select Name ID as the Outgoing claim type.
- Select EMail as the Outgoing name ID format.
- Select Pass through all claim values option.
- Click OK to save this rule.
- Click OK to finish creating rules.
We shall now export the certificate that needs to be copied over to Celoxis
- Open the AD FS > Settings > Certficates folder from the LHS menu. The Certificates pane showing all available certificates appears.
- Select the certificate under Token-Signing in the Certificates pane.
- Click the Copy to File option in the Details tab of the Certificate window. This starts the Certificate Export wizard.
- In the Welcome step, click Next.
- Choose Base64 encoded X.509 (.CER) as the file format in which the certificate is to be exported. Click Next.
- Save the file to an appropriate location and complete the wizard.
- Ensure that the saved file has the
.CERextension. - You will need to copy paste the contents of this file in the IDP Certficate field in Celoxis as described earlier in this document.
- Log in to the Azure portal.
- In the LHS menu, click Azure Active Directory.
- In the Azure Active Directory menu click Enterprise applications.
- Click New application at the top of the screen.
- In the Add an application section, choose Non-gallery application.
- Give the new application a name (e.g. Celoxis SSO) and then click Add at the bottom of the screen. This will add a custom application to your Azure Active Directory. Note: If you do not have Azure AD Premium activated, you will not be able to enter the name of the application.
- On the application page, click Users and groups in the LHS menu.
- At the top page the right pane, click Add user to assign users or groups to this application.
- Click Single sign-on in the LHS menu and then choose SAML as the single sign-on method.
- Click on the icon next to the title of the Basic SAML Configuration panel and enter details as follows:
- Identifier (Entity ID): Enter the value from the Single Sign-On tab (refer the image included above).
- Reply URL (Assertion Consumer Service URL): Copy the details from under the ACS URL field (Admin > Company Settings)
- Sign on URL: For SaaS enter
https://app.celoxis.com. For On-Premise enter your URL. - Relay State: Skip this field
- Logout URL: For SaaS enter
https://app.celoxis.com/psa/logout.do. For On-Premise enter[your-url]/psa/logout.do
- Return to the setup screen.
- Click on the icon next to the title of the User Attributes & Claims panel.
- Click on the icon next to Name identifier value. A Manage user claims sidebar will appear.
- Enter a name and select
user.mailin the Source attribute drop-down. Click Save. - Return to the setup screen.
- Click on the icon next to the title of the SAML Signing Certificate panel.
- Enter a notification email for the certificate expiry reminders. Click Save.
- Return to the setup screen.
- Click on Download next to the Certificate (Base64) option to save the certificate file on your computer. You should copy paste this in Celoxis as described earlier in this document.
- Return to the setup screen.
- Click on Validate to validate single sign-on with Celoxis.